Showing posts with label cake decorating. Show all posts

Sunday, December 12, 2010

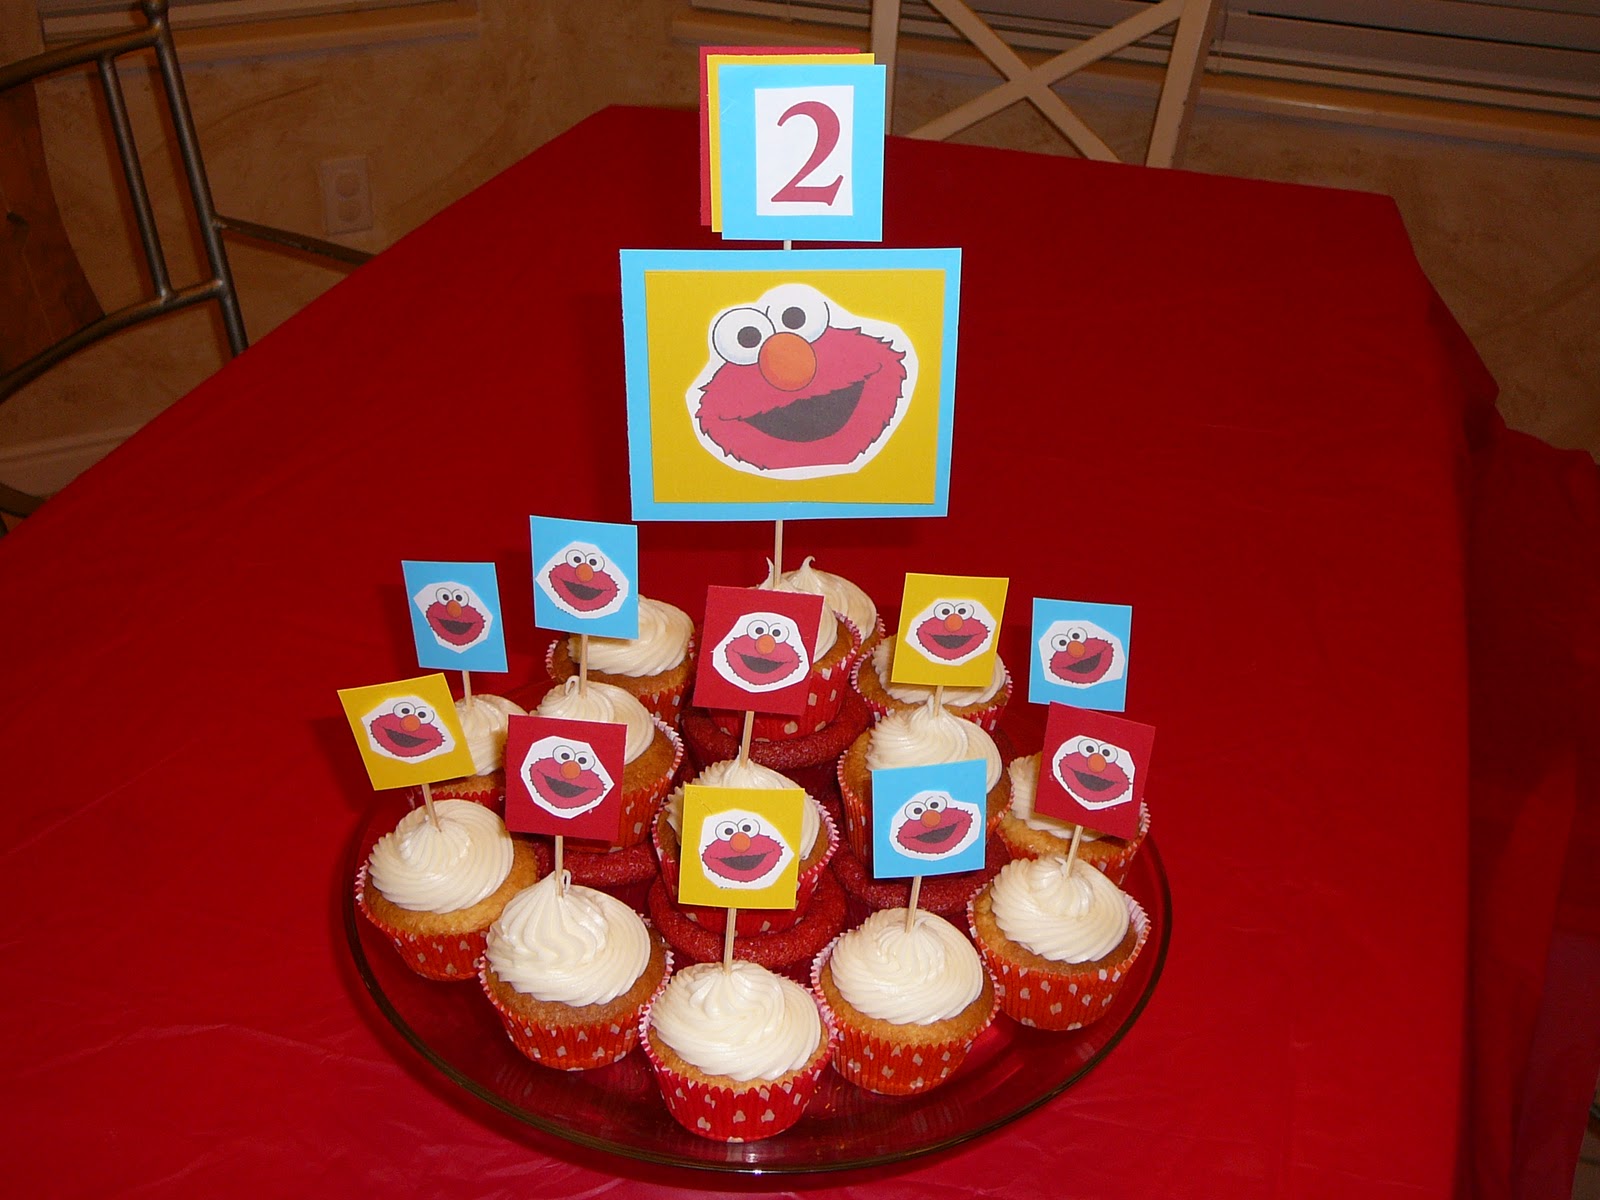
Elmo cupcakes (or otherwise titled I'm human and sometimes I know I'm just wasting my time)

My baby turned 2 recently. I almost always make extravagant cakes for my kids. Only once has one had a store bought cake and that was because we moved into our house the day before and were leaving the next day for a trip. So that time I took the easy way out. But being a cake decorator I put a lot of pressure on myself to create something incredible and cute every birthday!

My boy is obsessed with Elmo, so Elmo it was. I found tons of cute Elmo cupcakes on line and quickly figured out what I was going to make. A red velvet cupcake, with the whole top looking just like Elmo.

As I began on my baking journey it seemed everything and I mean everything went wrong. No black fondant at the store. No way to make black fondant, I tried painting the fondant then as a last ditch attempt I covered the mouths and eye centers in dark chocolate. It was so far from my vision I scratched the idea. Then my red velvet cupcakes came out of the oven and they tasted bland and boring, nothing like my traditional cupcakes...??? They were sent to the garbage.

WHAT THE HECK??? Am I being punished?

So I did what I had time for
ran to the store bought cake mix and pudding GASP!
Made cupcakes per box directions just adding pudding to zip it up.

Then I had my 9 year old daughter cut out the toppers. And with the limited time I had I hot glued everything together. It just was not my vision! But still cute and he was thrilled. Have you ever been there?


Here is the moral of the story...

Every time my kids look back on this birthday they will remember the delicious cute cupcakes and the wonderful time we had celebrating as a family.

So when it just doesn't work or is not working, then WHO CARES!
Come up with another solution and enjoy the celebration.

Thursday, August 5, 2010

Butterfly Cake

I hardly ever do tutorials, I guess it's simply my laziness. So I thought I would share a fun and easy birthday cake decorated as a butterfly. I was originally trained "The Wilton Way", don't get me wrong I like aspects of the Wilton way but there is a whole world out there when it comes to cake decorating. I value the skills I was taught and taught others but I love thinking outside the box and "TRYING" new ways.


Step 1
Find a picture of a butterfly with wings shaped the way you like and that would make a great cake outline. I used an actual pic of a decorated cake (get it here)

I love the design and shape of this cake, so I based mine on it.

Step 2
I baked one large sheet cake and cut it out visually using the picture of the butterfly.
No measuring, just eyeballing it. Cut a LIGHT outline into top of cake. Then asses what needs to change and adjust.  

*DO NOT CUT THROUGH ENTIRE CAKE UNTIL YOU SRE SATISFIED WITH YOUR FINAL SHAPE.*

Using a serrated knife trim cake into desired shape. Remember you can always cut more but you can never go back.

Option 2
Print an exact size butterfly shape, cut out and trace directly onto cake using food coloring pens (can be purchased in cake supply store or craft store.) 

Option 3
Go and get yourself a butterfly pan! Can you say Wilton way, if you are nervous this is thee easiest way out there.

Step 3
Ice entire cake with a white butter cream frosting. I did not do a thourough enough job and can see my small mistakes. take your time and ice it as evenly as possible.

I mixed 4 colors pink, purple, fuchsia, and green for the grass. Choose your colors and mix as desired. I measured 1 1/2 cups to 2 cups of each color. The worst thing you can do is run out of a specific colored icing, it's a nightmare. So be happy when you have extra, it varies between pressure.

Now plan your layout. Fill a pastry bag fitted with a coupler and a small round tip (Wilton 6-8) with the color you choose to outline (purple for me.) I free hand the outline starting with the oval shape body. Then work out  to the wings. You can always scrape and try again, frosting is so easy to work with!
Now you should have a pattern and design to fill in.

Now for a super clean look I pipe lots of stars.I just love the final product, so tidy.
Using a 18 open star tip (17 or 19 also work)  pipe directly up and down along the outline.
Essentially outlining in stars.
Here is the good news, Wilton has a triple star tip. Buy it right now it will save you time and energy. Tip 2010 and here is some great tips on how to use it. It does not fit on a coupler so just drop it in the bag also I always have to wipe the tip clean to ensure even stars. Seriously love it! I use this for filling in works like a charm.

So we are just piping over and over and over. At this point I always wonder why I do it, but I quickly remember the joy it brings me and my children. they live for homemade birthday cakes and plan them months and even years in advance. This year I received a drawing of the exact butterfly cake colors and all! I do it for them for their joy and happiness and for memories!


K now you are so close to done you could cry! For the bottom border I used a grass tip and piped grass, hey it's what the 7 year old ordered! Tip 233 or 234

I also thought the pipe cleaners added a little whimsy to my angels cake.

Yippee now you have created a one of a kind amazing cake!


Friday, March 26, 2010

Announcing the CRICUT CAKE (hurray)

Did you know you can make amazingly "patterened" cakes with your cricut? Well the main "ISSUE" is whether or not it is food safe? So announcing the new CRICUT CAKE... this is just a tease it will be available just befor mothers day in craft stores and before that on QVC. I'm so gonna offer to make a fab wedding cake and use the $ to buy one of these!

Remember fondant and gum paste are really so so so easy to work with! I'm convinced it is easier then icing a cake (just a lil more time consuming.)


Here she is, aint she a beaut?

Just imagine making something like this. You better believe my wheels are turning FAST! And the ease it will provide, who knows I may even love to make wedding/fancy b-day cakes again.
Pics thanks to cutting edge cakes

Stay tuned

Dream in fondant
KCL

Friday, March 12, 2010

Nothing but bundt cakes!

Or other wise titled, In the kitchen all day!

So I kinda volunteered to make 8 bundt cakes for a ward enrichment birthday celebration. I was excited about it and think they turned out super delicious and cute. Here in Sandy there is a little cake shop that makes the cuttest cake, but they are gonna cost you around $40. There is no way I would ever pay that (call me CHEAP!) I ended up at $40 for 8 Bundt Cakes including silk flowers. Not to shabby.

I used a friends recipe (thanks megan)! Scroll down her page and you'll find an amazing marble bundt recipe, and tons of other yummy stuff.

Chocolate batter


1 chocolate cake mix (I prefer a darker chocolate version)

1 small package chocolate fudge instant pudding

4 eggs

1/2 cup oil

1/2 cup water

1 cup sour cream

1 t vanilla

Combine all ingredients. This makes a rich, delicious and thick brownie like batter.

Grease and flour a standard size bundt pans (I use BAKERS JOY a spray like pam but it contains flour and makes it a snap to flour/grease).

Bake in a preheated 350 degree oven for about 50 minutes, or until a tester comes out clean. In my convection I started checking at 40 minutes.

Let cool in pan on wire rack for 10 minutes. Remove from pan and cool to room temperature on rack.


Cream Cheese Frosting

4 oz cream cheese, softened

1/4 cup butter, softened

1/8 cup vegetable shortening (this helps the frosting to harden)

1 t vanilla

1 tsp salt

3 1/2-4 cups powdered sugar

Blend on high until you get the desired consistency. You want it thick.

To frost, spoon frosting into a gallon freezer bag. Snip off the corner (start small and test it until you get the desired thickness). Frost cake in back and forth zig-zag pattern. Or use a decorator bag fitted with a round coupler or large round tip.

Last but not least
Add a flower. Fresh or Silk! If using fresh check to see which ones are food safe. Roses are food safe.


Thursday, July 9, 2009

Guitar cake (hannah montana)


So if you only care about the cake here it is. I also wanted to share some tips on the ROCK STAR birthday I just hosted, it was so much fun to plan and throw.

To the cake. I baked a 1/2 sheet cake. I decided to not fill the cake just to simplify. I carved out the silhouette of a guitar free hand. I must admit I had the Wilton pan in my hand and had second thoughts at the register. Somehow I decided I could ace of cake it and it was quite easy. I just pulled up some guitar pics on the internet and went to town. I then carefully iced the sides and top smooth. Make sure to wipe the bottom edge to try to keep your work as tidy as possible. Next I placed a cup upside down to create a circle to outline. I used a star tip #4 and piped stars in the circle in dark purple. I then made it up SERIOUSLY, I just wanted clean details. I did the same stars to the top of the guitar. And placed toothpicks to act as horizontal lines along the long handle. I added the strings which will be the hardest part. Make sure to use a thin icing to assure nice even unbroken lines. I then finished off with what details I felt would add some fun. My daughters name in a funky font. Polka dots. And feel free to be creative and make it your own. Have fun i sure did.

The Party
Our rock star party was so much fun. Colors green and purple and lots and lots of glitter and stars. We went to Hannah Montana the movie. On my front door I put a big sparkly star with my daughters pic on it. The favors were target dollar sun glasses which I put Hannah Montana stickers on the wrapping. Blow up guitars and microphones. I bought lots of silver stars from the party supply store. We had a blast. so many fun things could be done with this theme. Makeovers, dance party, home video party.........................................

Hope you are inspired to try this easy cake! CKL

Tuesday, June 30, 2009

Stars and Stripes (4th of July Cake)


For this oh so fun cake I used a star pan and simply tried to make it look like a us flag.

1 frost outside and top of cake white
2 now frost upper right corner in square shape blue for background of stars
3 begin frosting red stripes pipe star by star by star(using #12 star tip) across (you can trace lines with a toothpick to create a guide) then pipe a star border around the perimeter or the stripes (outlining all but the outer edge of blue section.)
4 add white stars (tip #12) to blue background. I think it is easiest to make them random.
5 now add blue star border to blue square outer edge
6 Last add blue star border to bottom edge cake
Yippee now you have the greatest red whit and blue cake ever!

Candyland cake


My daughter came up with the candy land theme all on her own. And of course a theme must be followed. So we got creative and made a taylorland cake (obviously her name). We had so much fun shopping for candy together and she was able to be hands on decorating her own bday cake. We both loved it to say the least.
be creative, have fun, and remember there are no mistakes just happy accidents.

Fish cupcakes


I must apologize that I do not have a better pic SORRY. I used a large star tip and piped a circle swirl to start. I then used round white mints (the only thing I could think of) for the eyes with a mini chocolate chip for the pupil. Then I made hearts out of melted white chocolate (you will need 4 hearts per cupcake.) Just melt slowly in microwave and then put chocolate in plastic ziplock bag and cut a super small hole in tip (remember you can always go bigger.) then pipe long hearts onto wax paper. Once hearts are set place in frosting point side in on top for top fin, 2 on opposite sides as side fins. And the last one on the back as the back fin. Last I used the pink RUNT hearts as lips. SOOOO cute.

Birthday Fish Cake


I am officially in birthday mood and have decided to share with you the easiest simplest funnest cake I ever did make. My daughters bday is in July so there have been way to many swim/water/fish/pirate parties to count. I love how simple this cake is to make.


1 One round cake
2 Frost with colored icing (any color that would make a good scale color) making C shapes to create fins (don't you just love it when it does not have to be smooth?)
3 Flatten gumdrops with rolling pin and place strategically
4 Flatten one large marshmallow and place as eye then add pupil. One chocolate chip.
5 Last step I promise use orange slice gummies and stack to make lips. Next stack to make top fin, side fin, and tail.

Seriously so easy that I made fish cupcakes! And I am no over achiever.